From Rocky Hillside to Usable Yard in Phases
We walk through how we turned a rocky, unmowable hillside into a usable, mowable yard using phased forestry mulching, rock removal, retaining walls, and sod.
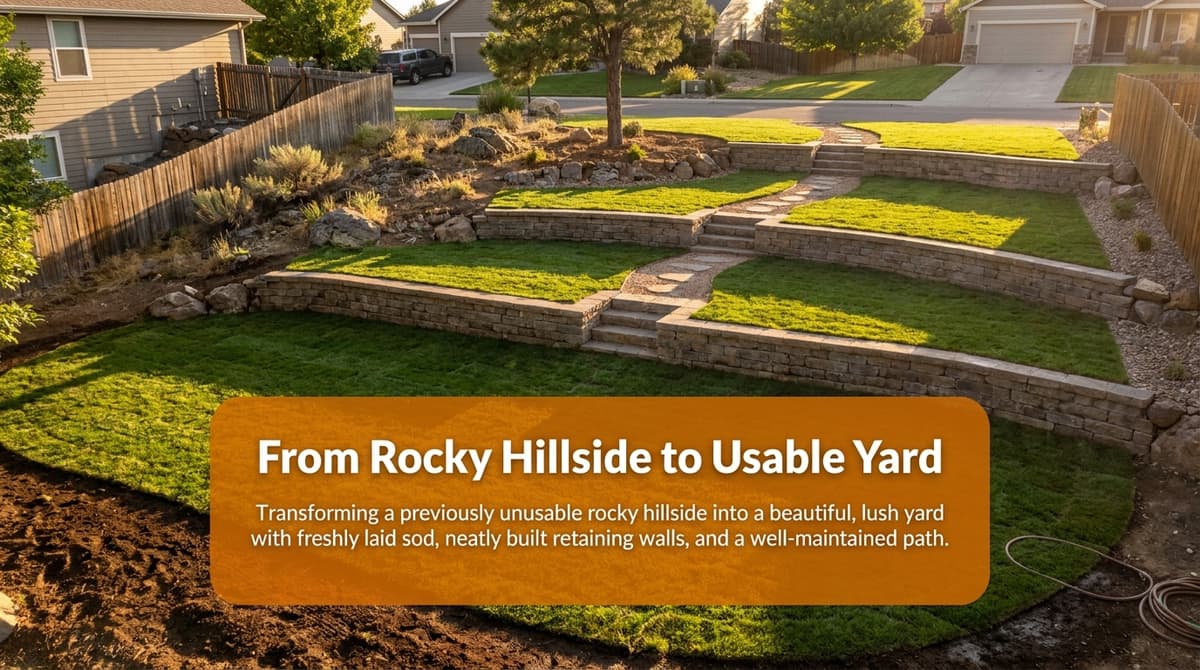
We recently got a call from a homeowner — let’s call him Brian — who was frustrated with a backyard hillside that was basically unmowable. The slope dropped from his deck down toward the property line, it was full of buried rocks from the original home excavation 40+ years ago, and the only way he could maintain it was with a weed eater. If he tried to run a mower, it would either scalp the ground or slam into hidden boulders.
As we talked through forestry mulching, rock removal, retaining walls, and sod over the phone, Brian’s yard turned into a perfect example of how we like to handle tough slopes in phases. In this post, we’ll walk through the same step‑by‑step approach we discussed with him so you can see how we turn rocky, unusable hillsides into safe, mowable, and attractive yards.
Why a Phased Approach Works Best on Rocky Hillsides
When someone calls us about a steep, rocky yard, they’re usually hoping for a “one and done” fix. The reality is, on older properties where excavation spoils were just spread around, the rocks are often buried at different depths and the slope has water runoff issues.
That’s why we recommend breaking projects like Brian’s into clear phases:
- Phase 1: Forestry mulching and brush clearing
- Phase 2: Rock removal and rough grading
- Phase 3: Retaining walls and slope stabilization (where needed)
- Phase 4: Final grading and sod installation
Tackling it in steps lets us solve the biggest problems first — safety, access, erosion — while keeping the project flexible for your budget and long‑term plans.
Phase 1: Forestry Mulching to See What You’re Dealing With
On our call, Brian originally reached out about forestry mulching. He had trees, brush, and waist‑high weeds hiding the shape of the ground and many of the rocks. That’s common on older Missouri hillsides.
Forestry mulching is usually where we start, because it:
- Clears brush, saplings, and vines without pushing soil around
- Leaves mulch on the surface to help control erosion temporarily
- Exposes rocks, stumps, and washouts so we can actually plan the next steps
How long does forestry mulching take?
For an area like Brian’s — less than about an eighth of an acre behind the house — we usually plan on half a day to a full day, depending on density of growth and access for our equipment. After this phase, you can finally see the slope clearly.
Phase 2: Rock Removal and Rough Grading
Once the hillside is cleared, the real problem usually shows up: rocks. In Brian’s case, the original builder likely spread excavation spoil across the backyard. Over decades, sediment settled around those rocks, burying them just enough to destroy mower blades but not enough to disappear.
Here’s how we typically handle rock removal on a slope:
- Walk the site with you: We mark visible rocks, problem spots, and how you’d like to use the space.
- Use a power rake or similar attachment: This lets us work the top 4–6 inches of soil and pull rocks up and out.
- Separate and haul off or reuse: Usable boulders can sometimes be repurposed in a retaining wall or landscape border; the rest we haul away.
What to expect during rock removal
For a small, steep section like Brian’s, rock removal and rough grading often take a day to two days. Our goal in this phase is to leave you with:
- A smoother, more even slope
- Far fewer surface rocks to catch mower blades
- Soil that’s ready for either a retaining wall or sod, depending on the plan
Phase 3: Retaining Walls to Tame the Slope
Brian mentioned he had a “stepped” backyard in mind — two levels instead of one long, steep drop. We hear this a lot, and it’s a smart way to make a hillside more usable and easier to maintain.
When we talk retaining walls with homeowners, we focus on three main options:
- Limestone walls: Great for a natural, local look and solid stability.
- Concrete construction walls: Best when you need serious structural support or higher walls.
- Boulder or hardscape walls: More of a landscape look, with large rocks stacked for both function and style.
Why we don’t quote walls over the phone
As we told Brian, we’re always hesitant to give a retaining wall price sight unseen. Wall height, drainage, soil type, and access all change the design and cost. That’s why we like to do a site walk with you, then build an estimate based on what actually makes sense for your yard.
On a typical project, the wall phase can take 2–5 days, depending on length, height, and material.
Phase 4: Final Grading and Sod for a Mowable Yard
Once the slope is cleared, rocks are under control, and any needed walls are in place, we move to the fun part: creating a lawn you can actually use. On the call, we talked with Brian about using a power rake to clean the top six inches and then rolling in sod so he’d finally have real grass instead of weeds.
Here’s how we usually finish a hillside:
- Fine grading: We smooth the surface, blend into existing lawn areas, and make sure water sheds away from the house and walls.
- Sod installation: We typically recommend tough turf like bermuda or zoysia for sunny slopes in our area.
- Initial watering plan: We’ll walk you through how often and how long to water so the sod roots into that cleaned‑up soil.
Maintenance tips after sod on a slope
After we install sod on a hillside, we usually suggest:
- Water lightly but frequently for the first 2–3 weeks so the slope doesn’t get soggy and cause runoff.
- Delay mowing until the sod is rooted enough that you can’t easily pull it up at the corners.
- Mow up and down the slope (not across) with a walk‑behind mower for better traction and safety.
How Homeowners Can Prepare Before We Arrive
On Brian’s project and others like it, there are a few simple things you can do before we show up to make the process smoother:
- Clear personal items: Move furniture, kids’ toys, and decor away from the work area.
- Mark underground utilities: Call for utility locates so we don’t hit lines when grading or digging.
- Think about long‑term use: Do you want a fire pit, play area, or garden beds later? Sharing that helps us shape the slope and walls with the future in mind.
From there, we’ll walk the site with you, talk through each phase, and put together a clear estimate and timeline — usually within two business days after the visit, just like we promised Brian.
Turning Your Rocky Slope into a Usable Yard
If your backyard feels a lot like Brian’s — all weeds, hidden rocks, and a slope you can’t safely mow — we want you to know there is a path forward. By taking it phase by phase with forestry mulching, rock removal, smart retaining walls, and new sod, we can turn that “unmowable” hillside into space you’ll actually enjoy and maintain with a regular mower instead of a weed eater.
When you’re ready, we’re happy to walk your property with you, share what we see, and help you build a phased plan that fits your budget and your long‑term vision for the yard.